
Have you ever wondered why certain files on your Windows 11 PC become corrupted automatically? For example, suppose your computer unexpectedly shuts down or crashes due to a power outage while saving a file. In that case, the file will likely be corrupted even if the saving procedure is completed correctly. However, another explanation for this virus and other malware attacks on your Windows 11 machine exists. Nonetheless, recovering your corrupted files is inconvenient and difficult because it requires significant time and work. But don’t worry; we have some simple and effective fix options for corrupted files on Windows 11 PC. So, if you’re concerned about this issue and want to learn more about the methods, stick with us until the conclusion.
Corrupted Files Reasons
We’ve previously discussed it, but in case you missed it, look at why your Windows 11 files become corrupted below.
1 – The installation is halted owing to a lack of connectivity.
2 – The PC shuts down unexpectedly owing to a power outage.
3 – Download and install files in an unauthorized manner.
4 – Your PC is infected with a virus or malware.
Easy Guide On How To Fix Corrupted Files In Windows 11?
It would be easier for you to comprehend the techniques to fix your corrupted files in Windows 11 since you are now aware of the reasons behind this issue. So, let’s have a look at the methods that are accessible.
Use DISM Commands
The Deployment Image Servicing and Management (DISM) command will look for the corrupted file associated or connected to your Windows file. Then, it will replace the corrupted file by downloading the most recent files from Microsoft’s official website. So, let’s go through the directions you’ll need to follow.
1 – Open the Command Prompt using the admin rights.

2 – Execute the command.
DISM/Online/Cleanup-Image/RestoreHealth

That’s all. Now, remember to continue the process until it is completed. Well, it may take a long time to complete depending on your PC files. After that, reboot your Windows 11 PC and check whether the issue has been resolved.
Scan For Corrupt Files
You may use the Sfc command to scan for corrupted files, and best of all, you don’t have to do anything since the Sfc command will handle everything for you. So, let’s go over the steps required to conduct sfc scan.
1 – Open the Command Prompt using the admin rights.
2 – Execute the command.
sfc/ scannow
You must now wait for the Sfc scan process to be completed. Remember to reboot your device after that and check whether the issue has been resolved.
Use The Safe Mode Feature
Users have noted that booting their PC into Safe mode helps resolve this problem in many circumstances. So you may give it a shot as well. As a result, let’s go over the steps one by one.
1 – To open the Run box, press the Win+R key combination.
2 – Search for msconfig. This will open the System Configuration dialog box.

3 – Navigate the road. Boot options > Safe Boot > Apply > OK.
4 – Now reboot your Windows 11 PC and open the command prompt with administrative privileges.
5 – Run the sfc scan again by typing the command.
sfc /scannow
Manually Replace Corrupt Files
Manually you can replace the corrupted files on your Windows 11 PC if these methods don’t work. But how exactly? Let’s see what happens.
1 – Download all the essential files from your Windows PC that you believe are corrupted.
2 – Go to the directory of the installed app that is crashing.
3 – Delete the corrupted files.
4 – Copy and paste the files into the app’s directory once the file has been downloaded. Then, reboot the device and check whether the issue has been resolved.
Via System Restore Feature
1 – Navigate to the Windows search box and type System Restore.
2 – A screen with Create a Restore Point will appear after that.
3 – Hit the Open button to open the System Properties settings and go to System Protection.
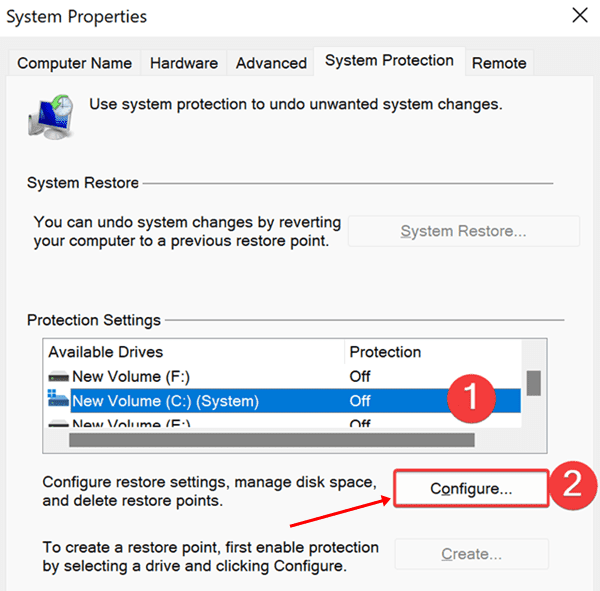
4 – Check if the System Restore button is greyed out now. If yes, select your drive from the list of available drives by clicking its name. Then press the Configure button.
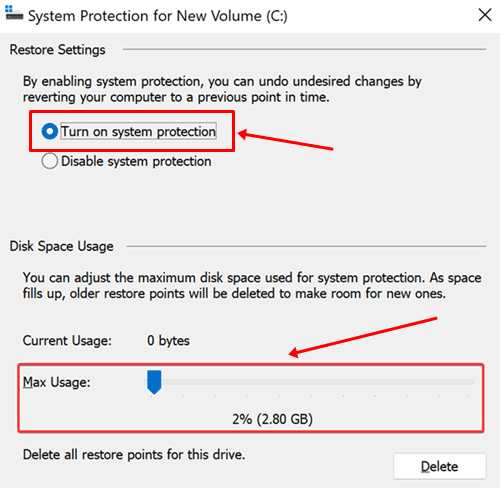
5 – Select the Turn On System Protection option on the following screen. Again, we recommend doing this for all drives where your data is kept.
6 – Click OK after selecting the Apply button. You’ll then see a System Restore option. In case you previously created a restore point, click it. Then, hit the Create Restore Point button if you choose.
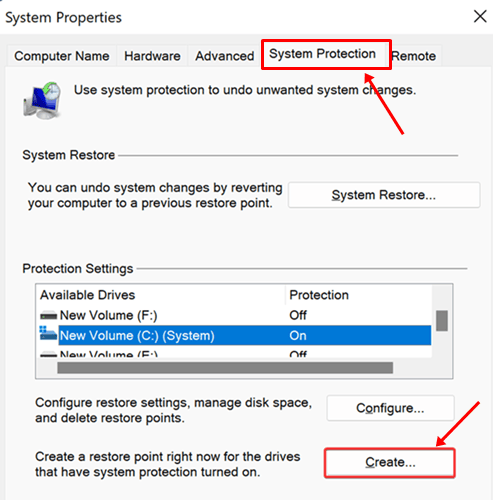
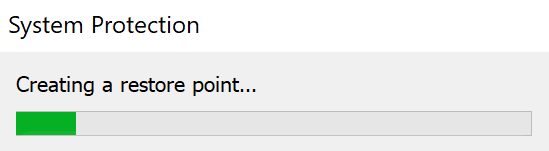
7 – Type a description for the restore point you’re about to create, then hit the Create button. Wait till the process is complete. When finished, you’ll get a notice indicating that the restore point was successfully established.
8 – Hit the System Restore button and repeat step 6. Then, select the previously generated restore point.
Conclusion:
That’s all. Wait for your PC to be returned to its previous functional state. Then, check whether the problem has been resolved after restarting your Windows 11 machine. That’s how you fix a corrupted file on a Windows 11 PC. We hope you found this post useful. However, if you have any queries, please leave them in the comments section.


