
A BSOD problem you may encounter on your system is a Video Memory Management Internal error in Windows 11. You may encounter this error for a variety of reasons, including incompatible accessories/peripherals, a GPU issue, and so on. The BSOD problem is familiar to the Windows operating system, and you may encounter it occasionally. Fixing Video Memory Management Internal Error is not difficult, and with the right troubleshooting method, you can fix the issue quickly. Here are some troubleshooting steps for fixing Video Memory Management Internet Errors on Windows 11.
Video Memory Management Internal Error In Windows 11? How To Fix
Update Graphics Driver
You will likely face this problem because your graphics drivers are out-of-date. You should try updating your graphics driver and then see whether the issue has been fixed. Follow the steps listed below to update the graphics driver.
- To open it, use the Windows + X key combination and then click Device Manager from the menu.
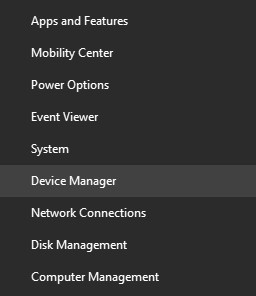
- Expand the Display Adapters options in the Device Manager by double-clicking on them.
- Right-click on the driver and select Update Driver.
- Now, click Automatically Search for updated driver software and follow the on-screen directions to update the drivers.
Using a laptop, you can go to the manufacturer’s official website. Here, you may search for the driver for your laptop model and download it. The issue should be fixed if you manually install the driver.
Run SFC Scan
Running the SFC scan is another method for fixing the Video Memory Management Internal Error in Windows 11. Due to faulty system files, you may occasionally face this issue. Follow the steps below to do the SFC scan.
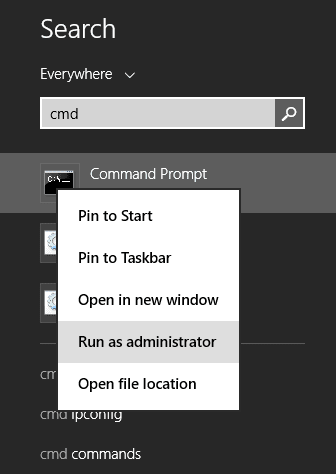
- CMD may be found by searching the Start Menu.
- Choose Command Prompt, then click Run As Administrator.
- Type and run the command sfc /scannow on the Command Prompt.
- After the procedure is finished, the issue will be fixed, so restart your PC.
Reset Window 11
The last option is resetting Windows 11 if you continue encountering this issue. Follow the steps listed below to reset Windows 11.
- By using the Windows + I key combination on your PC, you may access the Settings app.

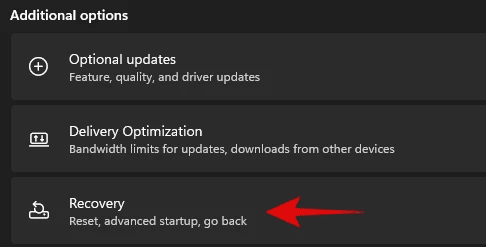
- Click the Recovery option on the System section’s right side.

- Under the Recovery Options section, click the Reset PC option.
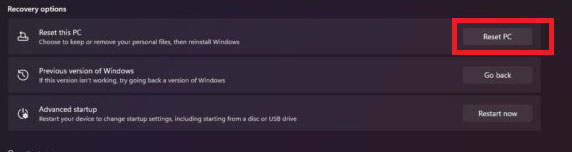
- You will be presented with two options. – Keep my files & Remove everything.
- Keep my files – This option will remove the apps and settings while retaining your files.
- Remove everything – This option will remove your PC’s files, apps, and settings.
- Now, follow the steps to reset your PC.
Conclusion:
You can fix the video memory management internal issue in Windows 11 by following the above steps. Follow the steps in this article to resolve the BSOD issue you are now experiencing with Windows 11.