Apple’s HEIC format conserves photos at just half the size of a standard JPEG image without compromising visual quality. Amazing, right? That’s why Apple used it the default camera image format on the iPhone. In short, HEIC assists a lot when it comes to handling storage.
Your iPhone may still end up with lots of space-consuming JPG images, particularly those auto-downloaded through social media apps. If you want to maximize some space, it’s finest to convert them to the HEIC format.
But how?
By a third-party file converter for the task can put sensitive images at risk. That is why I’m going to reveal how to convert JPG images to HEIC using just your iPhone itself. For that, you should make a shortcut.
Do not stress. The faster way is simple to develop. When you have set one up, you can convert bulk JPG pictures to the HEIC format in a single go.
Creating the Shortcut to Convert JPG to HEIC
To create a shortcut to convert JPG image to the HEIC format, you must have the Shortcuts app installed on your device. If you can’t search it, get it from the App Shop– it’s free.
However, before you start, it’s finest to create a different album to save your converted HEIC images. That needs to make it a lot easier to find them after performing a conversion with the shortcut we generate.
Go to Photos > Albums > New Album to create one — name it as ‘HEIC‘ or something along those lines.
All ready? Then let’s get started.
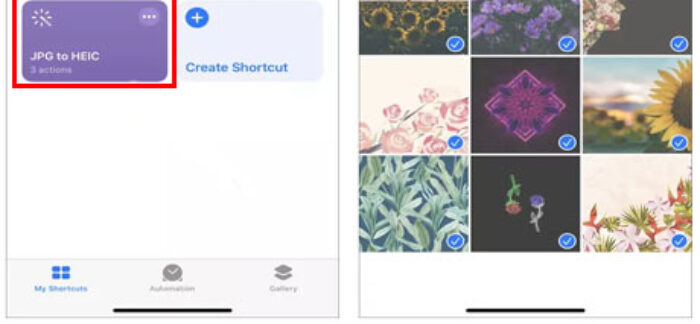
Step 1: Launch the Shortcuts app on your iPhone or iPad.
Step 2: Shift to the My Shortcuts tab, and then tap Create Shortcut. Click ‘Search for apps and actions’ to the bottom of the screen.
Step 3: Search for ‘select photos,’ and then click Select Photos under Actions. Afterward, expand the Select Photos action (Click Show More), and then turn on the switch next to Select Multiple.
Step 4: Click ‘Search for apps and actions’ again, search for ‘convert image’ this time, and then Click Convert Image under Actions.
Next, edit the Convert Image action from the default Convert Photos to JPEG; it Converts Photos to HEIF — to do so, click JPEG, and then select HEIF.
It’s a good idea to expand the action (click Show More) and confirm that the switch next to Preserve Metadata is turned on.
Step 5: Click ‘Search for apps and actions’ once more, perform a search for ‘save to photo album,’ and then Press Save to Photo Album under Actions.
If you generated an album to save converted HEIC images, select it now — press Recents, and then select the relevant album on the pop-up list.
In my case, I have picked an album called HEIC, which I created earlier. If you do not need to save the photos to any separate album, leave the action. Finally, press Next.
Step 6: Name the shortcut (e.g., JPG to HEIC), and then press Done.
The shortcut is created and ready work — time to put it through its paces.
Converting JPG to HEIC With the Shortcut
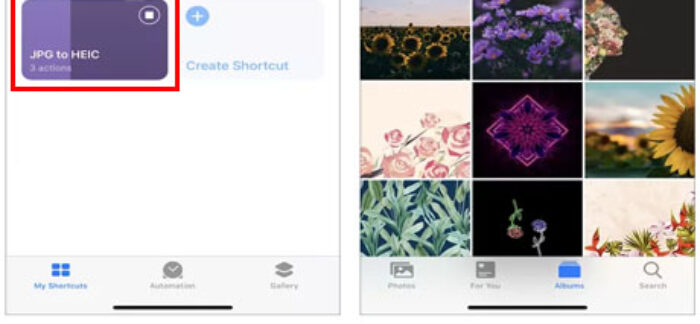
You can launch the shortcut that you just developed through the Shortcuts app. You can also run it through the Shortcuts widget or Siri (say, Hey Siri, ”shortcut name’).
Before you start, you might need to add the JPG images you are about to convert to a separate album in the Photos app. That way, you can easily erase them after the conversion process to avoid picture duplicates.
Step 1: Launch the JPG to HEIC shortcut. Use the Photos app image picker that appears to choose the JPEG images you want to convert– you can select as numerous images as you desire. Tap Done to start the conversion process.
Step 2: The shortcut will show the conversion progress. Once it’s done, head into the appropriate album within the Photos app to inspect the converted images.
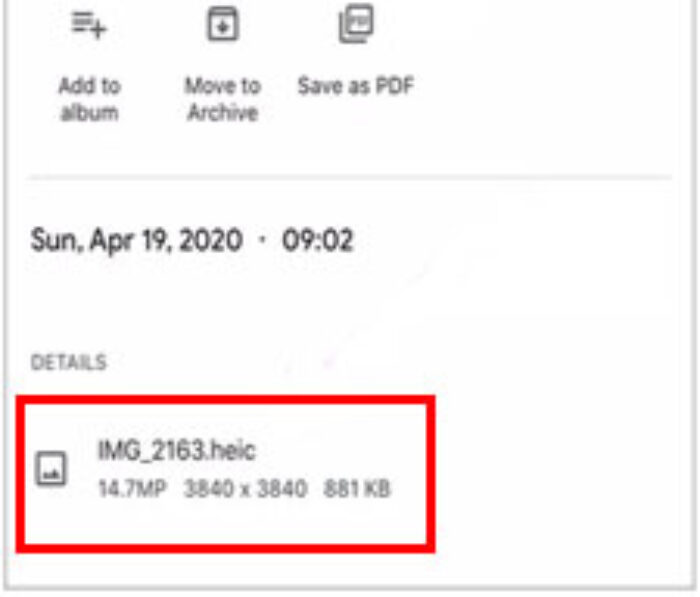
Step 3: Check (if you want) that the photos are in the HEIC format. The Photos app doesn’t let you examine an image’s file format, so I suggest using Google Photos for the task.
Just select a converted image in Google Photos, tap the three-dot icon to the upper-right corner of the screen, and you need to see the file format noted below Information.
If you developed the shortcut effectively, you need to have the images converted to the HEIC format. If all looks fine, you can delete the JPG originals.
High Efficiency
With the shortcut you just created, it’s exceptionally simple to convert JPEG images to the HEIC format. Beats having to suffer through an ad-ridden file converter.
Just keep in mind that aside from the minimized file sizes, converted HEIC images won’t acquire any other benefits– larger color gamut, depth maps, and so on– that you usually get when shooting photos straight in the HEIC format.


