
Suppose you are a Skype for Business user, you may already be familiar with the following error message: So, ‘There was an error communicating with the endpoint at [insert address].’ Let’s see how you can solve this login problem.
Skype for Business Failed to Communicate with the Endpoint
Update Skype
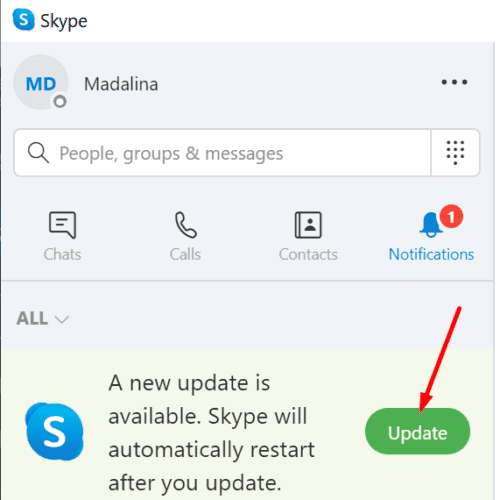
Initial things first, ensure you are running the latest Skype version on your machine. Now, Update Skype to install the latest hotfixes and benefit from the newest features. Suppose there’s a notification suggesting a new Skype version available, Tap on it and update your app.
Repair Office
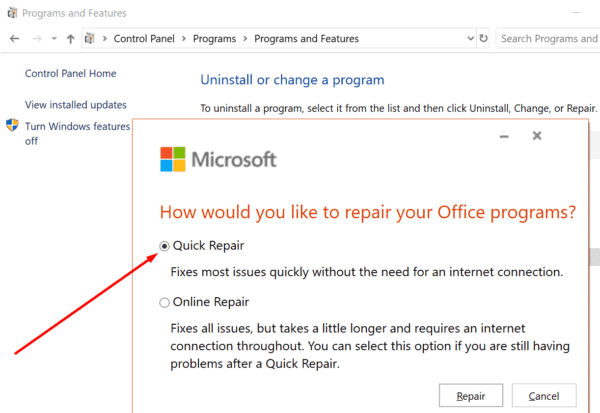
Well, Corrupted, damaged, or missing Office files could trigger all sorts of glitches and errors. Here, Repair your Office package and check if this Skype error persists.
- Now, Launch the Control Panel & click on Programs and Features.
- Choose Office 365 or Microsoft 365.
- Click the Change button and select Quick Repair. Again, the steps and select Online Repair as well.
Delete Sign-in Information
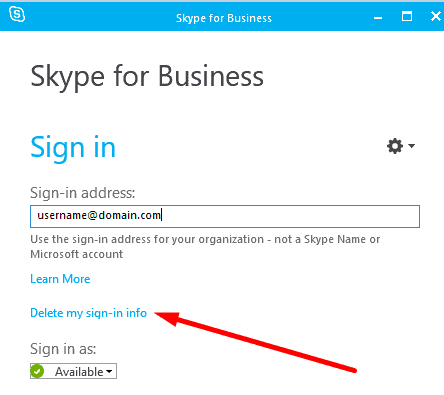
Now, Deleting your login information may help you to fix this issue. So, On the Skype sign-in screen, click on Delete my sign-in info. Here, Close Skype, relaunch the app and check if you can log in to your account now.
⇒ Note That: You may not have permission to put the troubleshooting suggestions below into practice. Though, Contact your IT admin for more information. Allow them to know about the error you are experiencing and what methods you used to get rid of it.
Reinstall Skype for Business
Uninstall your current Skype for Business app and then install the latest app version. Suppose something’s wrong with the installation files, downloading a fresh copy of Skype for Business should fix the issue.
Additional Tips from Users
- First, Check the Proxy Server settings. Assure the host is not using specific Proxy Server settings to block Skype from reaching the required destination.
- Then, Change Private memory limits. Most users managed to fix this problem by changing the Private memory limit value from the default value to 4194304 (4GB) in the WSUS pool. So, Don’t forget to update your system as well.
- Next, create a new user profile. And, Other users were able to fix this problem by creating a new user profile.
- Here, Clear junk files. Suppose you try to log in on another computer, often, the error is no longer present. Utilize Disk Cleanup or a Registry cleaner to remove junk and temporary files from your computer.
Also, Check :
Final Thought:
If you found this post helpful and easy to understand, let us know in the comments below.