
Write To NTFS Drives On Mac: I became quite angry with the Mac vs. Windows situation a few weeks ago. So I bought an external hard drive to utilize as a backup drive for both Mac and Windows computers. HOWEVER, when I connected the disk to my Mac computer, I realized that I could only see the drive’s contents but not copy or edit any files. I had no clue what had occurred, so I conducted a Google search. After reading many technical articles, I determined why an external hard drive is read-only on a Mac and several useful solutions for resolving this problem. If you’re having the same issue, continue reading.
Why Are You Unable To Write To An NTFS Drive?
This is mostly due to the incompatibility between Windows and macOS. To comprehend this, you must first understand the file system’s definition. In computers, a file system is a method through which an operating system manages files on a disk or partition. In other words, it determines how and where data is saved, read, and maintained on a storage disk. Several file systems are available, including FAT, NTFS, exFAT, HFS, HFS+, and APFS.
Different operating systems come pre-configured with a variety of file systems. For example, while Windows’ default file system is NTFS, macOS natively supports HFS, HFS+, and APFS. On the other hand, supporting another file system entails significant expense for the OS development and test teams, particularly for write support. As a result, Apple only permits read support for NTFS drives, not write support. Furthermore, you cannot edit, copy, delete, or transfer files between Mac and NTFS drives.
1. Have you ever wondered how to write to NTFS drives on Mac? Go ahead.
2. How Do I write to NTFS drives on Mac?
3. Fortunately, NTFS write access can be enabled on Mac with the following methods.
Run Third-party Drivers
Several third-party NTFS for Mac apps are available that may assist you with mounting NTFS drives in read-write mode, both paid and free. However, I would strongly advocate purchasing a paid NTFS drive over a free one since the free ones may not perform as well. Among the popular options is iBoysoft NTFS for Mac, which is simple to install and use on macOS Catalina and earlier. This utility enables smooth NTFS drive sharing between Windows and Mac. Not only is the software an NTFS drive, but it also functions as a disk manager. It can easily check for disk errors, see disk information, unmount a disk, and delete disk data.
Write To NTFS Drives With iBoysoft NTFS For Mac
1. Download, install and open iBoysoft NTFS for Mac.
2. Attach an NTFS drive to your Mac.

3. After mounting the NTFS drive successfully, you may open it and write to the NTFS drive as you usually would on a Windows PC.
Enable Apple Experimental Write Support
Although the NTFS write support is built within the macOS native driver, it is disabled by default due to the driver’s lack of reliability and performance. Nonetheless, you may enable writing support with command-line arguments.
Note: Remember that Apple does not officially authorize this method, so be prepared for possible disasters, such as data corruption or sequence loss. You’d be wise to create a backup of any critical data before doing the tasks. Let us continue with this in mind.
1. To launch Terminal, Go to Finder > Application > Terminal.
2. Type the following command line in the Terminal window and hit Enter.
sudo nano /etc/fstab
![]()
This will launch the nano text editor and open the fstab files. You will be prompted for your administrator password.
3. You will then see a new window with nothing in it. Copy and paste the command below.
LABEL=DRIVE_NAME none ntfs rw,auto,nobrowse
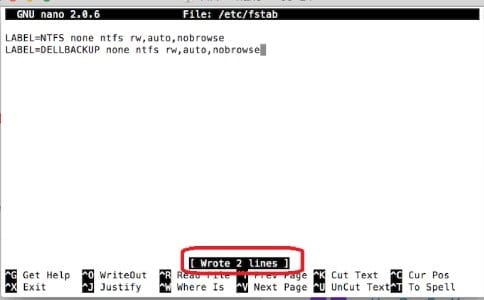
Remember to change DRIVE_NAME with the name of your NTFS drive. Then, to save changes, use CTRL + O, and to exit, press CTRL + X.
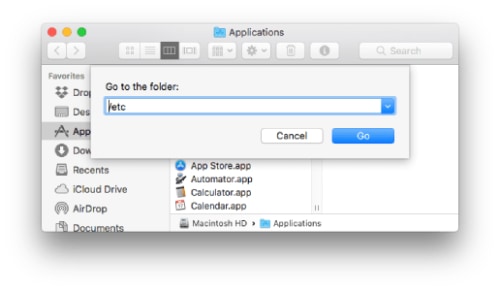
4. Shut down and restart your Mac. Click Go > Go to Folder in the Finder menu bar and type /Volumes. Then find and access your NTFS drive.
I hope the information provided above is much more beneficial to you.


