Accordingly, you just learned there’s a new Chrome version available. Generally, you hurry up to install the latest updates to keep your browser updated. Although you realize some error codes block the process and you can’t install the latest Google Chrome version on your computer. So now, In this guide, we’ll focus on three specific Chrome Update Errors that frequently bug users, namely errors 3, 11, and 12.
What makes these Chrome Update Errors mean?
- The Errors 3 and 11 indicate that Chrome failed to find or connect to the update server.
- And, Error 12 popped up when the download process failed while checking for updates.
How to Troubleshoot Chrome Update Errors 3, 11 and 12
1. Reboot your computer and network devices
Allows you to start with some basic troubleshooting methods, shall we? So, What do you do when something’s not working? OK, that’s it, you restart the problematic program or device.
This same is valid if Chrome won’t update. Move ahead and restart your computer, and unplug your modem/router.
Now, wait until your computer restarted, and then plug your modem/router back into the wall socket and power up your network devices.
Suppose these errors occurred because Chrome could not connect to the update server, restarting your Internet connection should fix the problem.
Expressing of connectivity issues, use a cable connection if possible. Then, Disconnect all the other devices and users using the relationship while you are updating Chrome or other programs.
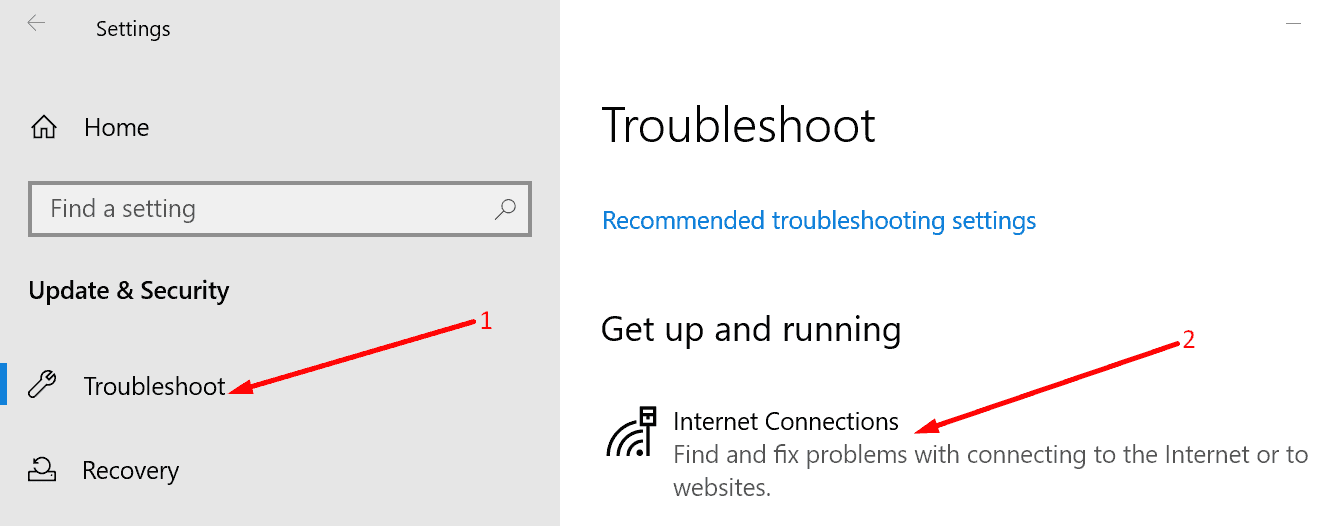
2. Run Windows 10’s built-in troubleshooters
Suppose your network settings are not set correctly, there are three network specialists you can run to fix the issue.
- Open the Settings app & go to Update & Security.
- Click on Troubleshoot & run the following troubleshooters one by one:
Incoming Connections
Network Adapter
- Now, Try to install Chrome again.
3. Check your antivirus and firewall settings
Confirm there are no rules or settings preventing users from downloading anything on your computer. So, Such settings will block update downloads as well.
Even You can go to your firewall and antivirus settings and whitelist Chrome. Either you can temporarily disable your antivirus and firewall while you are downloading and installing the latest Chrome updates.
Well, Re-enable your antivirus and firewall protection once you installed the latest Chrome version.
4. Disable proxy and flush DNS
Some Steps to disable proxy on your computer
- Move to Start and type inetcpl.CPL → Press Enter
- Tap on the Connections tab.
- Move to LAN settings
- Here, Check the option Automatically detect settings.
- Now, Uncheck the option Use a Proxy Server for your LAN
- So, Save the changes and reboot your computer.
Flush the DNS
Suppose the Chrome update server still remembers your previous IP address, the browser may fail to update.
Here, To flush the DNS, launch Command Prompt as an administrator and run the following command: ipconfig /flushdns.
5. Disable your extensions
Although, To rule out your active extensions as a possible cause of this issue, go ahead and disable all your browser extensions.
Close by the browser and then try to install the latest updates. Tap on the Chrome menu icon, go to Help, choose About Google Chrome, and hit the Update button again.
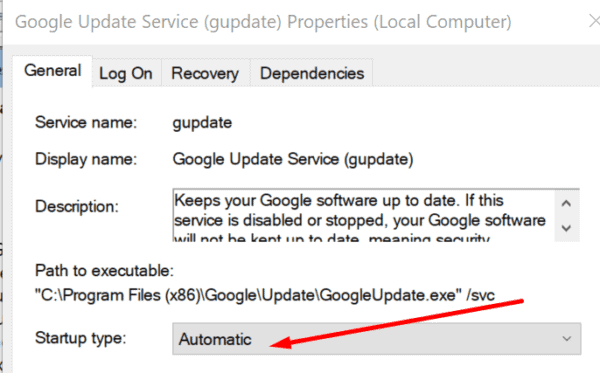
6. Enable Google Update Services
- First, Go to Start and type services to open the Services app.
- Then, Locate the Google Update Service (gupdate)
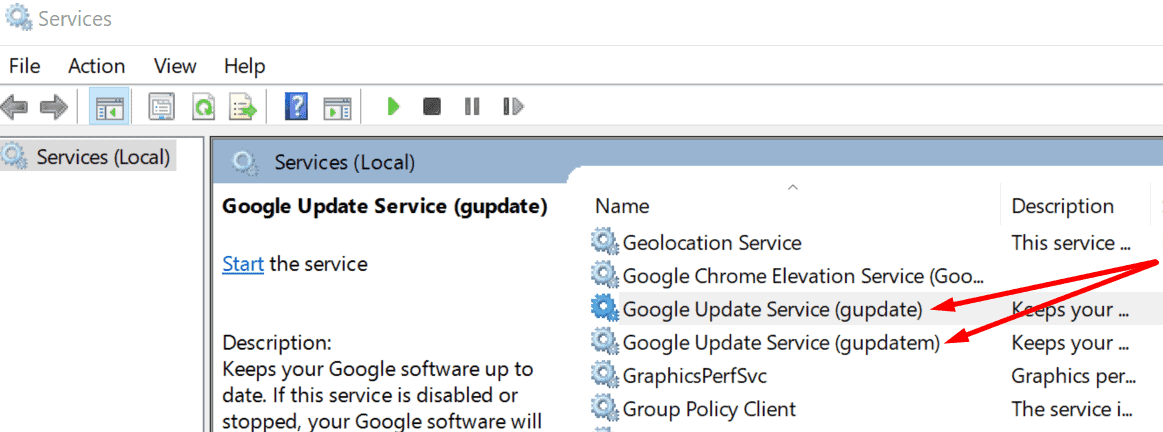
- Now, please double click on it and go to Startup.
- Here, Select Automatic → hit Apply and OK.
- So, locate the other Google Update Service (update)
- Well, Set the Startup type to Automatic as well
- Finally, Save the changes, close the browser, and try to install the latest updates.
Suppose that did not work, restart your computer and try again.
7. Enable Chrome update using the Windows Registry
- Now, Type Regedit in the search bar and hit Enter to open the Registry Editor
- Head to HKEY_LOCAL_MACHINE\SOFTWARE\Policies\Google
- Here, Locate the Updatedefault or Default key
- So, Right-click on it and select Modify
- Well, Edit the Value data to 1 and save the changes
- Move to HKEY_LOCAL_MACHINE\SOFTWARE\Wow6432Node\Google\Update
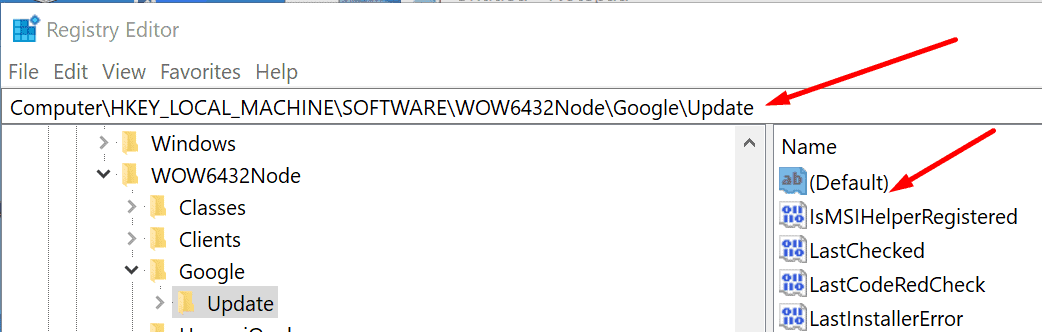
- Then, Locate the Default key and double-click on it
- Next, Edit the Value data to 1 to enable Chrome updates by default
- Lastly, Restart your computer, and try to update your browser.
Also, Check :
Suppose nothing worked, you could uninstall and reinstall Google Chrome. While you do that, your computer will automatically install the latest Chrome version.


