Use Android Pro Camera Mode: Smartphone camera technology has reached previously inconceivable levels. Using Google Lens and your phone’s camera, you can copy and paste handwritten notes. Even point-and-shoot digital cameras can’t compete with the photos generated by smartphones nowadays. There are smartphones with up to 108 MP cameras, such as the Motorola Edge Plus.
Using features such as HDR, hybrid zoom, and Night mode, however, the camera on any smartphone can capture amazing, well-lit photos. Still, many purchase DSLRs. Therefore, a smartphone camera cannot entirely outperform a DSLR. However, it can certainly compete with DSLRs. Here’s how to use the Android Pro Camera Mode. DSLRs allow photographers to control the exposure of a shot, along with a variety of other features that result in amazing photographs. However, modern cellphones also give this independence. Unfortunately, people do not often pay attention to such shooting modes.
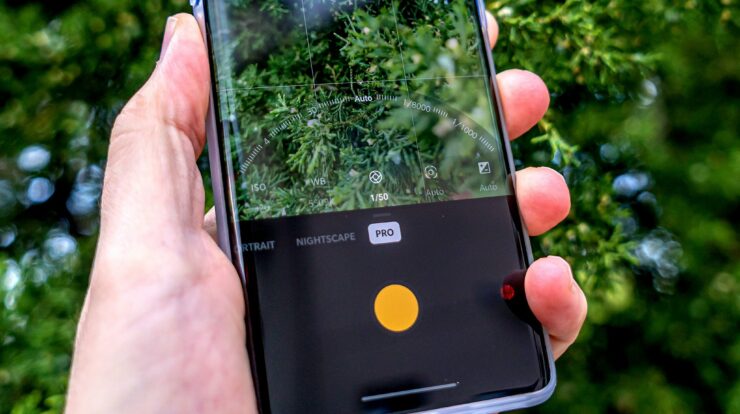
Try it! Examine the shooting modes under your camera app. You will likely find ‘Pro,’ ‘Expert,’ ‘Manual’ mode, or a mode with a similar name. When you regularly capture a photo with your Android smartphone, its artificial intelligence adjusts it automatically to make it seem good. However, this may not always work. Occasionally, the photo does not seem good at all. In contrast, the pro mode allows you to modify your photo rather than relying on AI. Self-adjustment of shutter speed, ISO, white balance, etc., will make your photos seem professional.
Pro Camera Mode Basics
After accessing the pro mode, you will see several buttons with values. As you move your device, these values will change. If you have used a DSLR, you would have seen a PASM dial. It represents the Program Auto mode. When entering the pro mode, PASM is immediately activated. Automatically adjust ISO, shutter speed, and white balance values. Here, you may click your photos immediately. They are also amazing. They will not be boosted by artificial intelligence and will not have their colors oversaturated.
Shutter Speed
You may control the camera’s shutter using the shutter speed. It implies you can control the rate at which the camera takes photos. If you want to capture a fast-moving subject, maintain a slow shutter speed. Here are examples of slow and high shutter speeds: Also, The shutter speed affects the photo’s brightness. The higher the shutter speed, the brighter the photo. Because when you change your shutter speed, your ISO also changes; this is the case.
ISO
ISO is a crucial feature of the pro camera mode. The ISO level is used to change the light sensitivity of your camera’s sensor. During the day or when there is abundant light, the ISO value should be adjusted to a low setting. However, if it is dark or there is little light, adjust the ISO to a high setting. As a result, photos taken in the dark will also be recorded in light. However, the higher the ISO, the higher the noise disruption. It impacts the photo. Therefore, keep the ISO on auto, and the shutter speed fasts for low-light photography.
Light Painting
With light painting, you may capture amusing photos. You must go into the dark and move a light item into the desired form to use this mode. The finished image will be breathtaking, as shown in the image. However, you will need a phone tripod or any other steady surface for your phone. This is necessary since this mode takes between 10 and 30 seconds to capture a photo. Therefore, keep your ISO as low as possible, preferably 100.
Shoot In RAW
This feature is for those who edit their photos after taking them. In this mode, the photo will be stored in RAW format instead of JPEG. The photo file size will exceed JPEG. This is because the AI processes JPEG images while RAW images remain unprocessed. It contains all the data collected by the sensor, and you decide what to discard and what to preserve. RAW allows you to edit lighting, shadows, and highlights, among other things. This is often not doable with JPEG photos.
Manually Adjust The White Balance
In photography, the white balance is a crucial element since it determines the color tone of the shot. You may have observed that certain phones, such as most Samsung phones, capture photographs with warmer tones, while others, such as most Google Pixel phones, capture images with cooler tones. Practically every smartphone manual mode can manually modify the white balance from presets such as sunny, overcast, incandescent, etc., to a color temperature determined in Kelvins. Typically, the color temperature range between 5,500 K and 5,700 K is considered neutral. However, depending on your tastes and the result you desire to achieve with your clip, you may lower it for a colder sound or raise it for a cooler sound.
Other Pro Camera Mode Settings
Although we’ve covered the fundamentals of utilizing Pro mode to learn, a few extra features are common throughout Android camera apps. For example, EV, or exposure compensation, is a straightforward method for adjusting the brightness or darkness of an image beyond the shutter and ISO settings. It permits precise modifications in tiny changes such as +0.7 or -0.3.
Light metering is an additional feature that may impact the final appearance of an image. Typically, ‘frame average’ is used because it splits the whole frame into equal zones and adjusts the total exposure depending on the average of those zones. This will provide you with good target information in extremely light situations and a good amount of details.
Center-weighted metering will modify the exposure based on what’s in the middle of the frame, regardless of where you’ve focused. In contrast, ‘Spot metering’ often modifies exposure based on the location of the target box, independent of the surrounding light source. This last approach effectively isolates the subject from the rest of the scene to make a good exposure.
Obtaining effective results from the ‘Pro’ feature on any device takes time, but it’s not tough once you’ve mastered the basics. So, proceed; test it out. You’ll be astounded by how much-untapped potential your default camera app possesses.


